I often hear from many people, that after starting using docker it is hard to refuse it.
I absolutely agree with this fact. Docker for development has decreased the number of configuration
errors in our project, so more time can be spent on coding instead of searching why some part doesn’t
work. It is very effective especially if a project contains different parts that are being edited by
different developers, for example frontend and backend. In such case it is undesirable to waist
frontend developer’s time for searching what package or config line is missing (or some other problem)
for running backend. Docker solves such difficulties. Moreover, a developer is no longer responsible for
setting environment for running project, so entering time to a project has been also decreased.
This article is a small advice: how to start using docker in a project.
What is expected
The standard way of entering to a new project is following:
- Preparing environment according to demands (OS and settings)
- Cloning project
- Install necessary packages for development (for example, nodejs, gradle, maven, etc..)
- Preparing project before first start (copying dirs, symlinks, setting configuration, hosts, etc)
These actions may take days of time if a project is rather big. Of course, it always goes something wrong, so other people have to spend time for helping.
Docker way is rather simpler:
- Cloning project
- Pulling or building docker image
- Run container based on this image
After this step running container is like a virtual box where everything inside is already prepared for development. It is needed only to run some script to get project running. Moreover, if someone accidentally has broken something, a container can be easily restarted to initial state.
In some cases several containers can be used for development. For example, some parts can be extracted to separated container, like database or frontend.
Simple example
The simple example is this blog. This blog is a jekyll project that can be launched from the root folder with command :
jekyll serve --host 0.0.0.0This command makes project available on localhost:4000. Ctrl+C stops server. To run this command I must have:
- Jekyll installed
- Jekyll plugin for pagination installed
- Source code
To provide it, I create a Dockerfile in the root of my project.
# As a parent image I'm using already prepared ruby image. It allows me
# to skip ruby installation which is needed for jekyll. There are a lot of prepared images on docker hub.
FROM ruby:2.4.1

# Installing necessary packages
RUN gem install jekyll:3.4.3 bundler:1.14.6 \
    && gem install jekyll-paginate:1.1.0 \
    && mkdir /kosbr

# Make this dir current (like cd command)
WORKDIR /kosbr

# Make port 4000 to be available from outside the container.
EXPOSE 4000
It is a good style to decrease the number of layers - the number of commands in a Dockerfile. That is why RUN command performs 3 actions. Also better to fix versions everywhere to avoid appearing some problems after.
Then, using this file everyone can build an image:
#private/myblog is an image name
docker built -t private/myblog .
Instead of doing this step an image can be downloaded from docker registry. Of course, in such case someone should build it and push before.
After this, the container can be created using image:
# insert real folder path instead of [clone-dir]
docker run -i -t -d --name "myblog" -v [clone-dir]:/kosbr -p 4000:4000 private/myblog /bin/bash
This command creates a container with following options:
- myblog - name of new container
- [clone-dir] will be mounted to /kosbr of the container’s file system. It will be like shared folder in virtual machine, so files on host and container will be always the same.
- Port 4000 of the container will be mapped to port 4000 of host. So localhost:4000 will redirect to 4000 port of the container.
- private/myblog is an image name.
- /bin/bash is a command that will be performed in container.
The last item is rather important. When this command finishes, the container will stop. /bin/bash never stops, so it guarantees that my container will work until I stop it. The /bin/bash command does nothing, so I have to enter in the container and launch the server by myself:
# get console of the container
docker exec -it myblog /bin/bash

# following actions are performed inside container
jekyll serve --host 0.0.0.0
After this the server is available on localhost:4000 on host.
I like this approach for developers, I believe they should control starting server, restart it if necessary, change configs and etc. But If I’m going to give this container to someone else, I will use ‘docker run’ with command, that launches server:
# insert real folder path instead of [clone-dir]
docker run -i -t -d --name "myblog" -v [clone-dir]:/kosbr -p 4000:4000 private/myblog somescript.bash
#It is assumed, somescript.bash contains commands that launch server
Make it easier
I don’t like writing run command. It is very long, has a lot of options and I have to remember ports, folders and names. The Docker compose project helps to simplify it.
The file docker-compose.yml (in the root) has following structure:
version: '2'
services:
  myblog:
    image: private/myblog
    ports:
     - "4000:4000"
    volumes:
     - ./:/kosbr
    tty: true
#    command: bash somescript.bash (use this line instead of next line if you want server autostart)
    command: /bin/bash
Then, the command below is equal to ‘docker run’ command, that was presented above.
docker-compose upIt is rather easy for users, isn’t it?
Several containers for development
Imagine, a project contains frontend and backend parts. Frontend developers want server to be working, but doesn’t want to know something about it. Moreover, they even don’t want to launch it by themselves. Backend developers also don’t want to deal with frontend. Moreover some people don’t want to touch both frontend and backend. And the one responsible developer needs to control all parts of the application.
The idea of development environment is following: The frontend is served at 4200 port. The backend is served at 8080 port. A proxy is used to redirect api requests from frontend to backend. (4200->8080). I decided to place frontend and backend in separate containers:
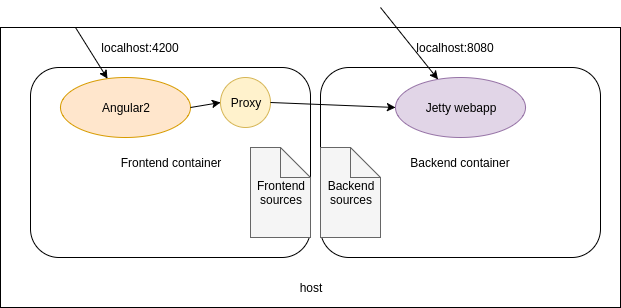
Every container has a volume that contains source code. Backend container is responsible for jetty web application that is available by 8080 port from outside (including frontend container). Frontend container is responsible for angular2 application. Also it contains proxy to redirect requests. So, using following configuration, ports 8080 and 4200 are equal for api requests.
I use following file structure:
project
    Dockerfile
    docker-compose.yml
    frontend/
        Dockerfile
        proxy-config.json
        ... some frontend sources
    ... some backend sources
Frontend is actually a folder in a project. proxy-config.json is a file that describes proxy. It is an angular cli project specific file, one may use other configured proxy.
This is corresponding docker-compose configuration. If someone doesn’t want to deal with some part, it is needed just uncomment proper lines before starting docker-compose.
version: '2'
services:
  frontend-service:
    build: frontend
    ports:
     - "4200:4200"
    volumes:
     - ./frontend:/root/src
    tty: true
#  Uncomment next line if you need fronted autostart
#    command: bash /root/src/frontend-start.bash
  backend-service:
    build: .
    ports:
     - "8080:8080"
     - "8000:8000"
# port 8000 is using for remote debug
    volumes:
     - ./:/root/src
    tty: true
#  Uncomment next line if you need backend autostart
#    command: bash /root/src/backend-start.bash
When you are using docker compose, you can use internal docker network for accessing to other containers. In the proxy configuration below I use the name of backend service that was declared in docker-compose.yml file.
  "/api": {
    "target": "http://backend-service:8080",
    "secure": false
  }
}
Conclusion
If you are not using docker for development, these arguments should push you start using it:
- Decreasing time for preparing environment for new developers
- Less probability of some environment problems
- Project behaviour is the same on all machines
- Separate of responsibility for different project parts
- Study of very important technology
- Probability to work on several projects using one computer
About drawbacks, I’ve found following ones:
-
The only possible debugging is remote debugging. It is rather comfortable for java projects using Idea, but probably it may lead to problems with other stack of instruments.
-
Launching ui applications. Docker wasn’t created for it, so if your development process needs some UI (like e2e tests in chrome) it won’t be so easy.
-
Profiling. Containers JVMs are not visible outside. However, using JProfile I launched agent in container and opened one more port to connect it with local JProfiler. I wouldn’t say it is a big problem.
In other words, since you are using docker, everything has become remote - it must be considered.
For me, docker was a step to creating clusters with micrsoservices. One more fashion and perspective direction today.