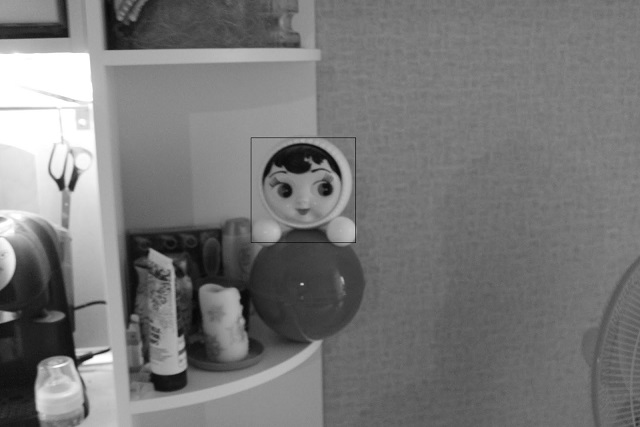
Month ago I faced with problem of detection some object in an image. After long internet surfing about it, I’ve found
out that the best approach to this problem is OpenCV library.
It is a cool library for working with images. It is written for all operation systems, it has rich possibilities,
it has good documentation. However, I used to work with Java, so I’ve found java wrapper for
it - JavaCV

Unfortunately, when I was writing this article the documentation of JavaCv was not ideal. First time I even started to use C++, but then I found one secret, that helped me to use javacv. The thing is that all classes and methods in JavaCv have the same (or similar) names as in C++. So the success way is to read C++ documentation (official openCV) and apply it to javaCV.
Practise exercise
To have a practise I decided to create detector of the toy.
This was my plan:
- To do a lot of photos with the toy (positive selection)
- To do a lot of photos without toy (negative selection)
- Install openCV
- To train detection algorithm and get a xml file as a result
- Add javaCV to my application
- Write code to detect the toy using generated xml file
Before start I’d like to tell a few words about the algorithm.
About the algorithm
The Viola–Jones algorithm is used for detecting objects in an image. This algorithm is implemented in openCV. It was created in 2001 and now it is hard to find a person, who has never faced with it. Striking example is simple phone or camera: it often detects faces:

The algorithm is rather complicated, there are a lot of descriptions in the internet. I’ll try to make the easiest description of it to make it clear even for 5 years old child. Of course, I’ll explain only the idea, the implementation is much more difficult.
Firstly let’s define that we work only with monochrome images. Every image can be easily transformed to black&white. For example, the task of the algorithm will be to detect a face. Let’s try to notice some face features:

What details can we find in the image? Dark areas on the left and right sides of nose. Light area above the eyebrows, but it is dark below it. Jowls are bright and etc. Painters always have to find such details to make a portrait real. So we may think that a portrait is a more primitive simulator of a real photo.

I’m sure everybody can find a face in this portrait. But what if we go deeper and replace all dark areas with black color and light areas with white color? Could you detect a face? Yes, it would be something like this, but monochrome:
![]()
We can make the image more primitive, but saving possibility to detect face. Next step is the same replacing, but use bigger granule: every square a few pixels length should be replaced with one color. You probably will find a face after such transform. Even if I remove all and show you picture like this, you would be able to detect face here:

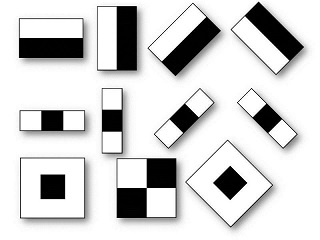
However, the last step is excess for the algorithm, but it perfectly shows the idea. Everything can be transformed to primitive, that can be easily parsed. Viola–Jones algorithm uses following primitives, that are called Haar-like features:

The training process is an investigating mapping between Haar-like features and object we want to detect. The detection process is iterating throw different areas in searching of matching Haar-like features.
The best advantage of this algorithm is high speed, that it is possible to detect online in a video. However, the training process may take a lot of time (days). One more important disadvantage is bad detection if the object is rotated.
Preparing selection
To get positive selection I have to organize a photo session in my apartment to my son’s toy. It was very funny, I’ve taken about 150 photos. Then I’ve taken the same number of photos without toy - negative selection. I did it in my apartment in different places with different lighting, in the same conditions I’m going to test it. This way I respect the rule, that selection must be close to real.
OpenCV installing
I did it on windows machine, the installation is very simple and contains three steps:
- Download self-extracting archive here
- Run it.
- Set environment variables:
OPENCV_DIR = [your opencv path]\build\x64\vc12 (or vc11 depends of version of Micrisof Visuial C++ )
PATH = PATH + %OPENCV_DIR%\bin
I recommend to use the latest version because it shows errors more detailed.
Training
Training of the algorithm is consist of two steps. First vec file with positive selection must be prepared by opencv_createsamples.exe program. The program has a lot of arguments that are listed in the documentation. The necessary minimum is below:
opencv_createsamples.exe -info good.txt -vec samples.vec -w 20 -h 20Let’s go throw all parameters of this command.
- good.txt - is a file that describes positive selection. Every line corresponds to one photo. Here is an example line:
good\1.jpg 1 0 0 414 148
First parameter is filename (relative path from good.txt), the second parameter is a number of objects on the photo. I always have one object in one photo. Next parameters describe a rectangle that contains the object. As you can see, before training I cropped all my pictures, so my rectangle contains whole photo area.
- samples.vec — The output file. It will be used for training.
- w and h - width and height respectively of a sample. The size should be about proportional to the real object size. Please, use as minimal values as possible, but the object must be detectable in an image with such size. My advice is to use additional options -num 5 -show to see result and correct params if it is needed.
The second step is directly training:
 opencv_traincascade.exe -data haar -vec samples.vec
 -bg bad.txt -numStages 16 -minHitRate 0.99
 -maxFalseAlarmRate 0.4 -numPos 140 -numNeg 150 -w 20 -h 20
I use here following params:
- haar — The folder with result
- samples.vec — The file with positive selection, it has been prepared at previous step
- bad.txt — The file with negative selection. The structure of file is similar to good.txt, but there is only one parameter per line - filename of an image from negative selection.
- numStages=16 — The number of cascade levels. More levels - more accuracy, longer training. Please, use something between 16 and 25.
- minHitRate=0.999 — quality of training coefficient. The part of possible errors with positive selection. Too big values lead to high level of false alarm.
- maxFalseAlarmRate =0.4 — Max level of false alarm.
- numPos=140 — The number of positive examples. It is recommended to set it 80% of real value.
- numNeg=150 — The number of negative examples.
- w=20 h=20 — The sample size. The same was used at the first step.
Training may take a lot of time. I had about 150 positive and negative examples, my training had been finished since several hours at 12th stage because of achieving max false alarm level. While I’m writing this post, another training process have been working for 3 days. After it finishes, result can be found in result folder. It is a xml file cascade.xml.
Java program for detection
As I mentioned at the beginning, I used JavaCV as opencv java wrapper. To use it I need to download jar from their site and add to my project. After I’ve done it, it is possible to write such class with method, that accepts two strings: filename of input image and filename of image for saving result.
 import org.bytedeco.javacpp.opencv_core;
 import org.bytedeco.javacpp.opencv_objdetect;

 import static org.bytedeco.javacpp.opencv_imgcodecs.*;
 import static org.bytedeco.javacpp.opencv_imgproc.cvRectangle;

 public class Detector {
     // the result of training file
     private static final String CASCADE_FILENAME = "C:\\learn\\cascade.xml";
     private static  opencv_objdetect.CascadeClassifier classifier = new opencv_objdetectCascadeClassifier(CASCADE_FILENAME);

  private static boolean handleImage(String srcFName, String resultFName) {
         // read image from file
         opencv_core.Mat mat = imread(srcFName, CV_LOAD_IMAGE_GRAYSCALE);
         // all found objects (coordinates) will be stored here
         opencv_core.RectVector rectVector = new opencv_core.RectVector();
         classifier.detectMultiScale(mat, rectVector); // directly detection
         boolean hasFound = rectVector.size() > 0;
         if (hasFound) {
             // if the object was found
             opencv_core.IplImage src = cvLoadImage(srcFName, 0);
             for (int i = 0; i <= rectVector.size(); i++) {
                 opencv_core.Rect rect = rectVector.get(i);
                 int height = rect.height();
                 int width = rect.width();
                 int x = rect.tl().x();
                 int y = rect.tl().y();
                 opencv_core.CvPoint start = new opencv_core.CvPoint(x, y);
                 opencv_core.CvPoint finish = new opencv_core.CvPoint(x + width, y + height);
                 // mark it with red rectangle
                 cvRectangle(src, start, finish, opencv_core.CvScalar.RED, 2, 8, 0);
             }
             cvSaveImage(resultFName, src); // and save copy with rectangles
         }
         return hasFound;
     }
 }
Please, be careful, openCV has different API depends of version. JavaCV is compatible with all of them, but you can face with old examples and docs that may mislead you.
How does it work?
After I’ve finished, I made a test for my program. I used a few dozens images of toy for test, in 17% cases it didn’t find the toy, but it was there. All error photos has common feature: close-up picture of the toy. Anyway, I’m really impressed of the possibilities of the algorithm.
