In the previous post, I described the docker swarm cluster for simple CRUD application. This article clarifies
how to create it step by step. Please, look throw the previous post before reading this one.
Given
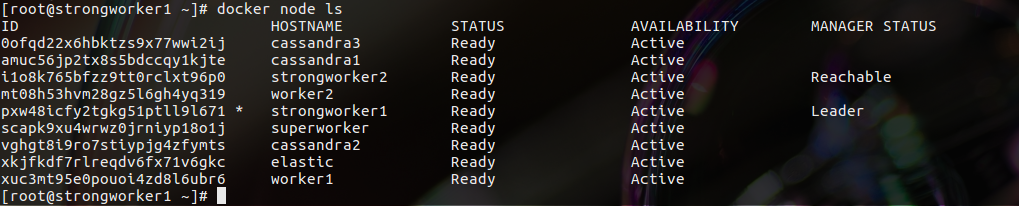
I have 9 nodes:
- cassandra1
- cassandra2
- cassandra3
- elastic
- worker1
- worker2
- strongworker1
- stringworker2
Step 0: Preparing nodes
Docker must be installed on every node. There are guides for different operation systems in the official docker documentation. Also, following ports should be opened on every node: 2376/tcp, 2377/tcp, 7946/tcp, 7946/udp, 4789/udp. Actually, not a manager node doesn’t need all of them, but it may become a manager once.
After all nodes are ready, they may be united into a cluster. A cluster is initialized from the one node - it will be the first manager of the cluster. In my case, the node “strongworker1” plays this role.
docker swarm initThe output of this command displays the text of the command for other nodes for joining into the new cluster. Using this text the rest nodes should be added to the cluster. For adding a node as a manager use another command. The first manager can display the text of the command as an output to:
docker swarm join-token managerAfter all nodes are added to the cluster, it is possible to set labels to them. Labels are needed for using them into conditions when deploying a service. I set following labels to my nodes:
docker node update --label-add cassandra2=true cassandra2
docker node update --label-add cassandra1=true cassandra1
docker node update --label-add elastic=true elastic
docker node update --label-add cassandra3=true cassandra3
docker node update --label-add worker=true worker1
docker node update --label-add worker=true worker2
docker node update --label-add worker=true strongworker1
docker node update --label-add worker=true strongworker2
docker node update --label-add worker=true superworker
Then, I’m able to use conditions like “This service should be deployed only on nodes with label ‘worker’” and similar.
Step 1: Create network
The services must have a possibility to communicate with each other. The most primitive way to provide it is to create a docker overlay network. Then, all services that are attached to this network will be able to see each other.
docker network create \
  --driver overlay \
  my-network
Step 2: Add visualization to the cluster
docker service create \
--name portainer \
--publish 9000:9000 \
--constraint 'node.role == manager' \
--limit-memory="2500m" \
--reserve-memory="2500m" \
--mount type=bind,src=//var/run/docker.sock,dst=/var/run/docker.sock \
  portainer/portainer \
-H unix:///var/run/docker.sock
It isn’t a necessary step, Portainer is just a UI for cluster management. I use it only for visualization.
Step 3: Create a Cassandra cluster
As it was written in the previous article, 3 Cassandra nodes are going to be created. It terms of the docker swarm, 3 separate services will be created. Every service will contain a Cassandra instance and those Cassandra instances will form the Cassandra cluster.
Actually, every docker swarm service is stateless, but it is inappropriate for a Cassandra service. Without any additional actions all, Cassandra data will exist as longer as service exists. For example, if I restart a node, I’ll lose all data. To avoid it, I use docker volumes - there is a lot of information about it in the official documentation. As a result, all data is stored in some directory on hosting machine. Before starting a Cassandra service, a volume directory must be created on every Cassandra node.
mkdir /cassandra-dataAnd then, these commands start three Cassandra services.
docker service create \
  --name cassandra1 \
  --replicas=1 \
  --network my-network \
  --publish 9042:9042 \
  --env CASSANDRA_BROADCAST_ADDRESS=cassandra1 \
  --env CASSANDRA_SEEDS=cassandra2,cassandra3 \
  --mount type=bind,source=/cassandra-data,destination=/var/lib/cassandra \
  --constraint 'node.labels.cassandra1 == true' \
  --limit-memory="2500m" \
  --reserve-memory="2500m" \
  cassandra:3.11

docker service create \
  --name cassandra2 \
  --replicas=1 \
  --network my-network \
  --publish 9043:9042 \
  --env CASSANDRA_BROADCAST_ADDRESS=cassandra2 \
  --env CASSANDRA_SEEDS=cassandra1,cassandra3 \
  --mount type=bind,source=/cassandra-data,destination=/var/lib/cassandra \
  --constraint 'node.labels.cassandra2 == true' \
  --limit-memory="2500m" \
  --reserve-memory="2500m" \
  cassandra:3.11

  docker service create \
  --name cassandra3 \
  --replicas=1 \
  --network my-network \
  --publish 9044:9042 \
  --env CASSANDRA_BROADCAST_ADDRESS=cassandra3 \
  --env CASSANDRA_SEEDS=cassandra1,cassandra2 \
  --mount type=bind,source=/cassandra-data,destination=/var/lib/cassandra \
  --constraint 'node.labels.cassandra3 == true' \
  --limit-memory="2500m" \
  --reserve-memory="2500m" \
  cassandra:3.11
These commands create three services: cassandra1, cassandra2 and cassandra3. All of them are in my network, so they are able to see each other. Environment variable CASSANDRA_SEEDS contains links to the other Cassandra services for forming a cluster. Option “constraint” provides a condition to every service for hosting node.
Then, it is needed to create a keyspace with simple replication strategy and replications number = 2. This is cqlsh script for it:
CREATE KEYSPACE guestbook
  WITH REPLICATION = {
   'class' : 'SimpleStrategy',
   'replication_factor' : 2
  };
The configuration of the Cassandra cluster and application is prepared to be tolerant if one node is down.
Step 6: Create redis
For using external configuration for Redis I use ‘docker config’ command. Next command creates a service using this config.
docker config create redisconf redis.conf
docker service  create  \
    --name redis \
    --publish 6379:6379 \
    --network my-network \
    --config redisconf \
    --constraint 'node.labels.worker == true' \
     --limit-memory="1500m" \
     --reserve-memory="1500m" \
     redis:3.2.0 redis-server /redisconf
If Redis service is restarted by some reasons, all data will be lost.
Step7: Create elasticsearch service
Before starting a service, following steps should be performed on the node ‘elastic’.
sysctl -w vm.max_map_count=262144
mkdir /es-data
chmod -R 777 /es-data/
Then it is possible to launch elasticsearch using volume. All logs will be kept here.
docker service create --name elastic \
  --network my-network \
  --constraint 'node.labels.elastic == true' \
  -p 9200:9200 \
  -p 9301:9301 \
  --mount type=bind,source=/es-data,destination=/usr/share/elasticsearch/data \
  --limit-memory="2800m" \
  --reserve-memory="2800m" \
  docker.elastic.co/elasticsearch/elasticsearch:5.5.2
Since it deals only with logs, I don’t create an elasticsearch cluster - one node is enough.
Step 8: Add Kibana
Kibana is a good UI for the elasticsearch. I tell it the address of the elasticsearch by the ELASTICSEARCH_URL environment variable.
docker service create --name kibana \
  --network my-network \
  --constraint 'node.labels.worker == true' \
  --env ELASTICSEARCH_URL=http://elastic:9200 \
  --env ELASTICSEARCH_USERNAME=elastic \
  --env ELASTICSEARCH_PASSWORD=changeme \
  --env SERVER_PORT=5601 \
  --limit-memory="2000m" \
  --reserve-memory="2000m" \
  -p 5601:5601 \
docker.elastic.co/kibana/kibana:5.5.2
Step 9: Add storage application (2 replicas)
My storage application reads environment variables CASSANDRA_HOSTS and CASSANDRA_KEYSPACE for connection to the database. It is described in the previous post, that this image contains the application with logstash instance. Logstash parses a log file and sends data to the elasticsearch. Logstash is configured by config file, so I just hardcoded there the elasticsearch host. However, it would be much more pretty if it was passed also throw docker service command. It is not difficult, but right now I decided to make it simpler and faster.
docker service create --name storage \
  --network my-network \
  --replicas=2 \
  --constraint 'node.labels.worker == true' \
  --env LOG_DIR=/var/log/guestbook-storage \
  --env CASSANDRA_HOSTS=cassandra1,cassandra2,cassandra3 \
  --env CASSANDRA_KEYSPACE=guestbook
  --limit-memory="1800m" \
  --reserve-memory="1800m" \
  -p 8081:8081 \
repo.treescale.com/kosbr/guestbook/storage:1.6
The application is written using spring boot. In spring boot applications it is possible to use environment variables in application.yml file and it will be automatically parsed by spring. It is very comfortable in such cases.
Step 10: Add gate application (2 replicas)
docker service create --name gate \
  --network my-network \
  --replicas=2 \
  --constraint 'node.labels.worker == true' \
  --env LOG_DIR=/var/log/guestbook-gate \
  --env STORAGE_HOST=storage \
  --env STORAGE_PORT=8081 \
  --env REDIS_HOST=redis \
  --env REDIS_PASSWORD=secret \
  --limit-memory="1800m" \
  --reserve-memory="1800m" \
  -p 8082:8082 \
repo.treescale.com/kosbr/guestbook/gate:1.0-SNAPSHOT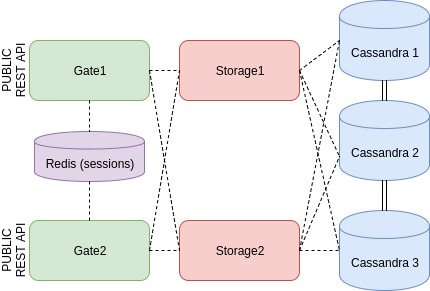
Now cluster is ready. Of course, it is almost impossible if everything works from the first time. Definitely, a lot of problems may appear during deploying a cluster, and it is the most interesting part of the learning and I think the most useful - it gives an experience. If something goes wrong these commands may help to understand what is happening.
To get logs of the service
docker service logs [serviceName]To get all tasks for this service. If the service is not stable, docker swarm will try to launch it many times, so many tasks will be created. If there is not enough memory or CPU for launching a service, it will be displayed here.
docker service ps [serviceName]Everything in the swarm has an ID: nodes, services, tasks, networks, etc.. This command displays a lot of information about the object.
docker inspect [id]It is important to use memory limits for every service. The docker swarm can set a usage limit for a service, also it can provide some defined amount of memory for a service. It will help to avoid cases when one service makes all node down and kills other services from this node.
If downloading an image takes a lot of time, better manually download it from every node where this image can be used. It decreases the time for the first start of a service and decreases downtime if a service moves to another node because of failure.